Cydia is a new package management replacement to the existing Installer.app. And it now also brings the gcc compiler to iPhone in firmware 1.1.x
Although it is slow to compile in iPhone but it is stable and very native.
You can follow these steps to install the compiler and related headers and utilities:
1. Set your iPhone Auto-Lock to "Never"
2. Goto Installer and install the package called "Cydia Installer" (version 1.0). It will take some time to download and install, so you should have connected your iPhone to Wifi
3. After installation of Cydia, iPhone will reboot and you will find a new icon "Cydia" in your Home Screen. Start "Cydia" and it will tell you to update Critical Packages. Follow the instructions to "Update All"
4. After update of Critical Packages in Cydia, install the following 3 packages
GNU C Compiler
Make
iPhone 1.1.1 Headers
5. Then you can have gcc compiler in your iPhone now. You can use Mac Terminal or putty to access the terminal of iPhone and start building your application.
Please take note that after the installation of Cydia, your BSD subsystem is now changed to Fake BSD subsystem and also fixed a number of bugs. So don't update BSD subsystem from the Installer.app
You may want to try some HelloWorld example, and here is the project that you can try
copy and unzip it to your iPhone
then
cd HelloWorld
make install
./restart
Then you will have a new program HelloWorld.
To uninstall this HelloWorld
make uninstall
Enjoy!

Saturday, June 28, 2008
Friday, June 27, 2008
Unoffical iPhone SDK (building iPhone OS2.0 app without using iPhone SDK)
It is possible to build iPhone OS 2.0 native application using open toolchain header and without using official iPhone SDK nor without Mac OS
Read this article
Upgrading the iPhone Toolchain
Read this article
Upgrading the iPhone Toolchain
Hide Status Bar
This is how to hide the status bar in iPhone. For the Open toolchain api is available. However, for Official SDK API, edit the Info.plist is necessary.
Official iPhone OS 2.0 SDK headers version
- Info.plist : Select all
<key>UIStatusBarHidden</key>
<true />

or. programmatically,

[[UIApplication sharedApplication] setStatusBarHidden:YES animated:NO];
Open Tool Chain headers version
- Hello.app : Select all
 [UIHardware _setStatusBarHeight:0.0f];
 [self setStatusBarMode:2 duration:0.0f];
 [self setStatusBarHidden:YES animated:NO];  // hide status bar
Xcode Tips
1. Read the Xcode Workspace Guide, it is available after launching Xcode. It is under Help -> Xcode Workspace Guide
2. Make full use of Snapshots to keep different versions of the project. It is under File -> Make Snapshot
3. Make full use of code completion. It is under Xcode Preferences > Code Sense > Code Completion > Automatically Suggest _> immediate
Press esc key for auto suggestion
4. There are two ways to search for API reference from the Xcode text editor:
Option–double-click a symbol name
Select an expression and choose Help > Find Selected Text in API Reference
Command–double-click a symbol name
and goes to the header file (command-shift-w to close the header file)
5. Learn and use Refractor instead of Find & Replace
6. Use Project -> Class Browser
7. Use #pragma in source code to improve readability
#pragma mark PRINTING FUNCTIONS
To add a separator to the Function menu use:
#pragma mark -
8. Short Cut Keys in code editor
indent : Command-]
un-indent : Command-[
block select : Option key while clicking and dragging
9. Use this DEBUGLOG to replace NSLog
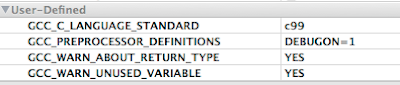
In the project settings of Debug add this user-defined setting (under Debug)
Then, you can simply use DEBUGLOG(@"Testing output %.2f", myFloat); in your code
and in Debug Build NSLog will be used, but in Release Build or Distribution Build, no NSLog output.
.
.
.
2. Make full use of Snapshots to keep different versions of the project. It is under File -> Make Snapshot
3. Make full use of code completion. It is under Xcode Preferences > Code Sense > Code Completion > Automatically Suggest _> immediate
Press esc key for auto suggestion
4. There are two ways to search for API reference from the Xcode text editor:
Option–double-click a symbol name
Select an expression and choose Help > Find Selected Text in API Reference
Command–double-click a symbol name
and goes to the header file (command-shift-w to close the header file)
5. Learn and use Refractor instead of Find & Replace
6. Use Project -> Class Browser
7. Use #pragma in source code to improve readability
#pragma mark PRINTING FUNCTIONS
To add a separator to the Function menu use:
#pragma mark -
8. Short Cut Keys in code editor
indent : Command-]
un-indent : Command-[
block select : Option key while clicking and dragging
9. Use this DEBUGLOG to replace NSLog
#ifdef DEBUGON
#define DEBUGLOG if (DEBUGON) NSLog
#else
#define DEBUGLOG
#endif
In the project settings of Debug add this user-defined setting (under Debug)
GCC_PREPROCESSOR_DEFINITIONS DEBUGON=1

Then, you can simply use DEBUGLOG(@"Testing output %.2f", myFloat); in your code
and in Debug Build NSLog will be used, but in Release Build or Distribution Build, no NSLog output.
.
.
.
Thursday, June 19, 2008
UIAccelerometer Sample Code
It is possible to use Open Tool Chain Header with the SDK and the official iPhone OS 2.0 SDK headers, the following demonstrates these two versions for the Accelerometer
Official iPhone OS 2.0 SDK headers version
- SensorSDK3.app main.m : Select all
/
//  main.m
//  SensorSDK3.app
//
#import <UIKit/UIKit.h>

int main(int argc, char *argv[])
{
    NSAutoreleasePool * pool = [[NSAutoreleasePool alloc] init];
    int retVal = UIApplicationMain(argc, argv, nil, @"SensorSDK3AppDelegate");
    [pool release];
    return retVal;
}- SensorSDK3AppDelegate.h : Select all
//
//  SensorSDK3AppDelegate.h
//  SensorSDK3.app
//

#import <UIKit/UIKit.h>
#include <stdio.h>
#include <time.h>
#include <math.h>

#define kUpdateFrequency 10  // Hz


@interface SensorSDK3AppDelegate : NSObject  {
    UIWindow *window;
 UITextView   *textView;
 UIImageView  *xarrow;
}

@property (nonatomic, retain) UIWindow *window;
@property (nonatomic, retain) UITextView *textView;
@property (nonatomic, retain) UIImageView  *xarrow;

- (void)acceleratedInX:(float)xx Y:(float)yy Z:(float)zz;
- (void)accelerometer:(UIAccelerometer *)accelerometer didAccelerate:(UIAcceleration *)acceleration;
@end - SensorSDK3AppDelegate.m : Select all
//
//  SensorSDK3AppDelegate.m
//  SensorSDK3.app
//

#import "SensorSDK3AppDelegate.h"

UIImage *createImageWithText(CGSize imageSize, NSString *text);

@implementation SensorSDK3AppDelegate

@synthesize window;
@synthesize textView;
@synthesize xarrow;

- (void)applicationDidFinishLaunching:(UIApplication *)application {

 self.window = [[[UIWindow alloc] initWithFrame:[[UIScreen mainScreen] bounds]] autorelease];


 self.textView = [[UITextView alloc] initWithFrame: [[UIScreen mainScreen] applicationFrame]];
 self.textView.font = [UIFont systemFontOfSize:24];
    self.textView.editable = NO;
    self.textView.textAlignment = UITextAlignmentLeft;

 UIImage *img = createImageWithText(CGSizeMake(85,40),@"-->");
 self.xarrow = [[UIImageView alloc] initWithImage:img];
 self.xarrow.center=self.textView.center;
    self.xarrow.clearsContextBeforeDrawing = NO;


    [textView addSubview:xarrow];

 // Show window
 [window addSubview:textView];
 [window makeKeyAndVisible];

 [[UIAccelerometer sharedAccelerometer] setUpdateInterval:(20.0 / kUpdateFrequency)];
 [[UIAccelerometer sharedAccelerometer] setDelegate:self];

}

/*
The meaning of X, Y, Z by Erica Sadun (with modification for the range from -1.0 to 1.0 for firmware 2.0)
X = Roll X corresponds to roll, or rotation around the axis that runs from your home button to your earpiece.
    Values vary from 1.0 (rolled all the way to the left) to -1.0 (rolled all the way to the right).

Y = Pitch. Place your iPhone on the table and mentally draw a horizontal line about half-way down the screen.
    That's the axis around which the Y value rotates.
 Values go from 1.0 (the headphone jack straight down) to -1.0 (the headphone jack straight up).

Z = Face up/face down. I expected the Z value to correspond to yaw. And it does not.
    It refers to whether your iPhone is face up (-1.0) or face down (1.0).
 When placed on it side, either the side with the volume controls and ringer switch, or the side directly opposite
 , the Z value equates to 0.0.
*/

- (void)acceleratedInX:(float)xx Y:(float)yy Z:(float)zz
{

   // Create Status feedback string
   NSString *xstring = [NSString stringWithFormat:
      @"X (roll, %4.1f%%): %f\nY (pitch %4.1f%%): %f\nZ (%4.1f%%) : %f",
      100.0 - (xx + 1.0) * 100.0, xx,
      100.0 - (yy + 1.0) * 100.0, yy,
      100.0 - (zz + 1.0) * 100.0, zz
   ];
   self.textView.text = xstring;

   // Revert Arrow and then rotate to new coords
   float angle = atan2(xx, yy);
   angle += M_PI / 2.0;

 CGAffineTransform affineTransform = CGAffineTransformIdentity;
 affineTransform = CGAffineTransformConcat( affineTransform, CGAffineTransformMakeRotation(angle));
 self.xarrow.transform = affineTransform;

}

- (void)accelerometer:(UIAccelerometer *)accelerometer didAccelerate:(UIAcceleration *)acceleration {
 [self acceleratedInX:acceleration.x Y:acceleration.y Z:acceleration.z];
}


- (void)dealloc {
 [textView release];
 [xarrow release];
 [window release];
 [super dealloc];
}

@end

// Returns an image of the given size containing the given string
UIImage *createImageWithText(CGSize imageSize, NSString *text) {

 // Create a bitmap graphics context of the given size
 CGColorSpaceRef colorSpace = CGColorSpaceCreateDeviceRGB();
 CGContextRef context = CGBitmapContextCreate(NULL, imageSize.width, imageSize.height, 8, imageSize.width*4, colorSpace, kCGImageAlphaPremultipliedLast);
 CGColorSpaceRelease(colorSpace);
 if (context== NULL) {
   return nil;
 }

 // Custom CGContext coordinate system is flipped with respect to UIView, so transform, then push
 CGContextTranslateCTM(context, 0, imageSize.height);
 CGContextScaleCTM(context, 1.0, -1.0);
 UIGraphicsPushContext(context);

 // Inset the text rect then draw the text
 CGRect textRect = CGRectMake(4, 2, imageSize.width - 8, imageSize.height - 8);
 UIFont *font = [UIFont boldSystemFontOfSize:24];
 [[UIColor blackColor] set];
 [text drawInRect:textRect withFont:font lineBreakMode:UILineBreakModeWordWrap alignment:UITextAlignmentCenter];

 // Create and return the UIImage object
 CGImageRef cgImage = CGBitmapContextCreateImage(context);
 UIImage *uiImage = [[UIImage alloc] initWithCGImage:cgImage];
 UIGraphicsPopContext();
 CGContextRelease(context);
 CGImageRelease(cgImage);
 return uiImage;
}
Open Tool Chain headers version
- HelloSensor.app : Select all
/*
 HelloSensor.app
 main.m
*/
#import <Foundation/Foundation.h>
#import <UIKit/UIKit.h>
#import <UIKit/UIWindow.h>
#import <UIKit/UIHardware.h>
#import <UIKit/UIApplication.h>
#import <UIKit/UIImageView.h>
#import <UIKit/UIImage.h>
#import <UIKit/UITextView.h>
#include <stdio.h>
#include <time.h>
#include <math.h>

#ifdef ASPEN
#ifndef UIKIT_UIFont_UIColor_H
#define UIKIT_UIFont_UIColor_H
typedef float CGFloat;
#import
#import
#endif

#ifndef UIKIT_UIAccelerometer_H
#define UIKIT_UIAccelerometer_H
#import
#define kUpdateFrequency 10  // Hz
#endif

#endif


#ifdef ASPEN
@interface HelloSensor : UIApplication
#else
@interface HelloSensor : UIApplication
#endif
{
        UIWindow     *window;
  UIView       *mainView;
        UITextView   *textView;
        UIImageView  *xarrow;
}
#ifdef ASPEN
- (void)acceleratedInX:(float)xx Y:(float)yy Z:(float)zz;
- (void)accelerometer:(UIAccelerometer *)accelerometer didAccelerate:(UIAcceleration *)acceleration;
#endif
@end

@implementation HelloSensor


#ifdef ASPEN
// UIAccelerometer delegate method in SDK
- (void)accelerometer:(UIAccelerometer *)accelerometer didAccelerate:(UIAcceleration *)acceleration {
 [self acceleratedInX:acceleration.x Y:acceleration.y Z:acceleration.z];
}
#endif

/*
The meaning of X, Y, Z by Erica Sadun
X = Roll X corresponds to roll, or rotation around the axis that runs from your home button to your earpiece.
    Values vary from 0.5 (rolled all the way to the left) to -0.5 (rolled all the way to the right).

Y = Pitch. Place your iPhone on the table and mentally draw a horizontal line about half-way down the screen.
    That's the axis around which the Y value rotates.
 Values go from 0.5 (the headphone jack straight down) to -0.5 (the headphone jack straight up).

Z = Face up/face down. I expected the Z value to correspond to yaw. And it does not.
    It refers to whether your iPhone is face up (-0.5) or face down (0.5).
 When placed on it side, either the side with the volume controls and ringer switch, or the side directly opposite
 , the Z value equates to 0.0.
*/

- (void)acceleratedInX:(float)xx Y:(float)yy Z:(float)zz
{
   // Create Status feedback string
   NSString *xstring = [NSString stringWithFormat:
      @"X (roll, %4.1f%%): %f\nY (pitch %4.1f%%): %f\nZ (%4.1f%%) : %f",
      100.0 - (xx + 0.5) * 100.0, xx,
      100.0 - (yy + 0.5) * 100.0, yy,
      100.0 - (zz + 0.5) * 100.0, zz];
   [textView setText:xstring];

   // Revert Arrow and then rotate to new coords
   [xarrow setTransform:CGAffineTransformIdentity];
   float angle = atan2(yy, xx);
   angle *= 180.0/3.14159;
   [xarrow setRotationBy:angle];
}


- (void) applicationDidFinishLaunching: (id) unused
{
#ifdef ASPEN
 [UIHardware _setStatusBarHeight:0.0f];
 [self setStatusBarMode:2 duration:0.0f];
 [self setStatusBarHidden:YES animated:NO];  // hide status bar
#endif

    struct CGRect rect = [UIHardware fullScreenApplicationContentRect];
    rect.origin.x = rect.origin.y = 0.0f;
    window = [[UIWindow alloc] initWithContentRect: rect];
    mainView = [[UIView alloc] initWithFrame: rect];

    textView = [[UITextView alloc] initWithFrame:
          CGRectMake(0.0, 0.0, 320.0, 480.0)];
    [textView setEditable:NO];
#ifdef ASPEN
    [textView setFont:[UIFont systemFontOfSize:24]];
#else
    [textView setTextSize:24];
#endif
    [mainView addSubview: textView];

// I changed the arrow by getting it from Notes app
 xarrow = [[UIImageView alloc] initWithFrame: CGRectMake(135.0, 320.0, 50.0, 46.0)];
 UIImage *img = [[UIImage imageAtPath:@"/Applications/MobileNotes.app/arrow right.png"] retain];

//  If you want the original arrow get it from http://www.tuaw.com/2007/09/10/iphone-coding-using-the-accelerometer/
//  xarrow = [[UIImageView alloc] initWithFrame: CGRectMake(50.0, 320.0, 200.0, 50.0)];
// [[UIImage imageAtPath:[[NSBundle mainBundle] pathForResource:@"arrow" ofType:@"png" inDirectory:@"/"]] retain];


    [xarrow setImage:img];
    [textView addSubview:xarrow];

    [window orderFront: self];
    [window setContentView: mainView];

#ifdef ASPEN
    [window makeKeyAndVisible];
 [[UIAccelerometer sharedAccelerometer] setUpdateInterval:(1.0 / kUpdateFrequency)];
 [[UIAccelerometer sharedAccelerometer] setDelegate:self];
#else
 [window makeKey: self];
    [window _setHidden: NO];
#endif

}
@end

int main(int argc, char *argv[]) {
 int returnCode;
 NSAutoreleasePool *pool = [[NSAutoreleasePool alloc] init];
 returnCode = UIApplicationMain(argc, argv, [HelloSensor class]);
 [pool release];
 return returnCode;
}
Wednesday, June 18, 2008
First iPhone SDK Application
It is possible to use Open Tool Chain Header with the SDK and the official iPhone OS 2.0 SDK headers, the following demonstrates these two versions
Official iPhone OS 2.0 SDK headers version
- HelloSDK.app : Select all
/*
  main.m
  HelloSDK
*/
#import <UIKit/UIKit.h>
@interface MyView : UIView {
}
@end
@implementation MyView
- (void)drawRect:(CGRect)rect {
  [[UIColor whiteColor] set];
  [@"Hello SDK" drawInRect:CGRectMake(0, 100, 320, 50)
                         withFont:[UIFont fontWithName:@"Marker Felt" size:50]
                         lineBreakMode:UILineBreakModeMiddleTruncation
                         alignment:UITextAlignmentCenter];
}
@end

@interface HelloSDK2AppDelegate : NSObject {
    UIWindow *window;
    MyView *contentView;
}
@property (nonatomic, retain) UIWindow *window;
@property (nonatomic, retain) MyView *contentView;
@end

@implementation HelloSDK2AppDelegate
@synthesize window;
@synthesize contentView;

- (void)applicationDidFinishLaunching:(UIApplication *)application {
 // Create window
 self.window = [[[UIWindow alloc] initWithFrame:[[UIScreen mainScreen] bounds]] autorelease];

    // Set up content view
 self.contentView = [[[MyView alloc] initWithFrame:[[UIScreen mainScreen] applicationFrame]] autorelease];
 [window addSubview:contentView];

 // Show window
 [window makeKeyAndVisible];
}

- (void)dealloc {
 [contentView release];
 [window release];
 [super dealloc];
}
@end

int main(int argc, char *argv[])
{
    NSAutoreleasePool * pool = [[NSAutoreleasePool alloc] init];
    int retVal = UIApplicationMain(argc, argv, nil, @"HelloSDK2AppDelegate");
    [pool release];
    return retVal;
}
Open Tool Chain headers version
- HelloToolChain.app : Select all
/*
 HelloToolChain.app
 main.m
*/

#import <Foundation/Foundation.h>
#import <UIKit/UIKit.h>

// include for the sdk compiler and open toolchain headers
#ifndef UIKIT_UIFont_UIColor_H
#define UIKIT_UIFont_UIColor_H
typedef float CGFloat;
#import <UIKit/UIFont.h>
#import <UIKit/UIColor.h>
#endif

@interface HelloToolChain : UIApplication
{
}
@end

@implementation HelloToolChain
- (void) applicationDidFinishLaunching: (NSNotification *)aNotification
{
 UIWindow *window = [[UIWindow alloc] initWithContentRect: [UIHardware fullScreenApplicationContentRect]];
 UITextLabel *label = [[UITextLabel alloc] initWithFrame: CGRectMake(0, 100, 320, 50)];
 [label setFont:[UIFont fontWithName:@"Marker Felt" size:50]];
 [label setCentersHorizontally: YES];
 [label setText:@"Hello ToolChain"];
 [label setBackgroundColor:[UIColor blackColor]];
 [label setColor:[UIColor whiteColor]];
 UIView *mainView = [[UIView alloc] initWithFrame: [UIHardware fullScreenApplicationContentRect]];
 [mainView addSubview: label];
 [mainView becomeFirstResponder];
 [window orderFront: self];
 [window makeKeyAndVisible];
 [window setContentView: mainView];
}
@end

int main(int argc, char *argv[]) {
 int returnCode;
 NSAutoreleasePool *pool = [[NSAutoreleasePool alloc] init];
 returnCode = UIApplicationMain(argc, argv, [HelloToolChain class]);
 [pool release];
 return returnCode;
}
Sunday, June 8, 2008
SDKs for iPhone
Open Toolchain
Open Toolchain [1] is for the development of 1.x native application for iPhone, It can be used in Mac OS X (Intel/PPC) 10.4/10.5, Linux, Cygwin or MinGW. This SDK uses gcc cross compiler for the development.
Build from sources method:
- http://code.google.com/p/iphone-dev/wiki/Building for Mac OSX 10.4 (PPC/Intel) / Ubuntu / Fedora / Gentoo / Debian / CentOS / XP Cygwin / XP MinGW
- http://wikee.iphwn.org/howto:toolchain_on_leopard for Mac OSX 10.5 Leopard
There are also Pre-build Binary for different Operating System (OS) and CPU
- WinChain (Only for Windows XP) WinChain Download from this ftp site
- Binary ToolChain Installer (Only for Mac OS X 10.4 Tiger and Intel CPU) Download from here
- iPhone Toolchain VMWare Debian Linux Image [use for VMWare Player / VMWare Workstation (win) / VMWare Fusion (Mac)] VMWare Debian Linux Image Download from this ftp site
There were some changes in 1.1.2/3 API, toolchain header files should also be updated
iPhone SDK
iPhone SDK is the offical development tools from Apple Inc for iPhone Developer to develop firmware 2.0 Native Application. It is only available for Mac OS X 10.5.2 and Intel CPU (see ppc hack here).
The latest iPhone SDK beta 8 can be downloaded from Apple iPhone Developer Website,
Previous version of iPhone SDK can be downloaded from this ftp site. After installation of the iPhone SDK, all the sample codes of that version of SDK can be obtained from harddisk. They are in
/Developer/Platforms/iPhoneOS.platform/Developer/Documentation/DocSets/com.apple.adc.documentation.AppleiPhone2_0.iPhoneLibrary.docset/Contents/Resources/Documents/samplecode
There are numerous limitations [2] for iPhone SDK in development of official iPhone software, Therefore iPhone Dev Team provides a how-to use iPhone SDK with Open Toolchain API
It is now also possible to build firmware 2.0 app without using the official sdk and Mac OS. Read this article - Upgrading the iPhone Toolchain
Apple Inc has also provided iPhone Web Application documentation, but it is less attractive than Native Application.
Xcode Template
To build iPhone Native Application for 2.0, you can
- Join the Apple iPhone Developer $99 program and follows the offical SDK API
- Install the Open toolchain headers and the Xcode Template as per instructions here

Subscribe to:
Posts (Atom)